How to Check DNS for Multiple Domains at Once Using Google Sheets

Yesterday, I needed to get current results for the “Nameservers” for a batch of about 400 domains. To look each domain up manually would take forever—even using dig from the Linux terminal like I do it. Plus, I wanted to record the results in a spreadsheet for reference and for some quick analysis.

I had the domains in a Google Sheet already, so it was just a matter of spinning up a quick Google Apps Script to perform the DNS lookups and return the results to the Google Sheet.

Naturally, I turned to Google to help with this situation and stumbled across this piece by Alex Miller on Medium that suggested a method for doing exactly what I wanted to do. Unfortunately, I had some trouble with Alex’s code, which relied upon queries to a Google DNS service.

Thankfully, he linked out to a useful Stackoverflow thread which provides quite a few code options for performing DNS lookups in Google Sheets. It’s clear from the history of the responses that various public DNS resolvers have come and gone in the ~6 years since the question was originally asked. Naturally, changes in Google Apps script have also affected the utility of some of the scripts in the replies.

The Solution: Using Cloudflare’s 1.1.1.1 DNS Resolver with Google Sheets

I tested some code that appears in this reply to the Stackoverflow thread linked above, but had some difficulty at first. No matter what I added to my formula for “record type,” the query returned an IP address corresponding to the “A record” for the domain.

That led me to find the code (below) from Cloudflare’s 1.1.1.1 Docs:

function NSLookup(type, domain) {

  if (typeof type == 'undefined') {
    throw new Error('Missing parameter 1 dns type');
  }

  if (typeof domain == 'undefined') {
    throw new Error('Missing parameter 2 domain name');
  }

  type = type.toUpperCase();

  var url = 'https://cloudflare-dns.com/dns-query?name=' + encodeURIComponent(domain) + '&type=' + encodeURIComponent(type);

  var options = {
    muteHttpExceptions: true,
    headers: {
      accept: "application/dns-json"
    }
  };

  var result = UrlFetchApp.fetch(url, options);
  var rc = result.getResponseCode();
  var resultText = result.getContentText();

  if (rc !== 200) {
    throw new Error(rc);
  }

  var errors = [
    { name: "NoError", description: "No Error"}, // 0
    { name: "FormErr", description: "Format Error"}, // 1
    { name: "ServFail", description: "Server Failure"}, // 2
    { name: "NXDomain", description: "Non-Existent Domain"}, // 3
    { name: "NotImp", description: "Not Implemented"}, // 4
    { name: "Refused", description: "Query Refused"}, // 5
    { name: "YXDomain", description: "Name Exists when it should not"}, // 6
    { name: "YXRRSet", description: "RR Set Exists when it should not"}, // 7
    { name: "NXRRSet", description: "RR Set that should exist does not"}, // 8
    { name: "NotAuth", description: "Not Authorized"} // 9
  ];

  var response = JSON.parse(resultText);

  if (response.Status !== 0) {
    return errors[response.Status].name;
  }

  var outputData = [];

  for (var i in response.Answer) {
    outputData.push(response.Answer[i].data);
  }

  var outputString = outputData.join(',');

  return outputString;
}

I’m not 100% sure how close the two code snippets are to one another (they may be identical, I just didn’t check). Once I implemented the code from Cloudflare, though, the issue with only receiving the “A” record result persisted.

Here’s what I learned about getting it to work.

The mistake I was making was that I was manually adding the record type to the formula I was typing in Google Sheets. For example:

=NSLookup(NS,A2)

where “NS” is the record type I was hoping to retrieve and “A2” is the cell containing the domain name.

Once I added a column for the record type, everything worked. My updated formula reads:

=NSLookup(D2,A2)

where “D2” is the cell containing the record type.

In hindsight, I probably could have just wrapped the NS in quotes and my first attempt at this formula probably would have worked.

In any case, this worked beautifully. I was able to retrieve the Nameserver records for more than 400 domains in a matter of just a few seconds, and then do some quick “conditional formatting” to easily note the specific situations I was trying to track down.

One thing that occurred, though, was that Cloudflare’s DNS resolver returned refused for maybe 20 or 30 of the domains. I suspect this was a result of throttling. I was able to force the query to run again by modifying the “record type” value, which triggered Google Sheets to notice the formula reference was no longer current, and the script ran again. Changing the record type back to “NS” in the corresponding cell caused the query to return the proper result for the “Nameserver” record as expected.

I hope this helps someone! Feel free to ping me in the comments if you have questions or thoughts. Cheers!

The Easy Way to Display Full URLs in Chrome

Something about a recent update to the Chromium browser on my Linux machine borked one of my user profiles.

No big deal. I’ll just set it back up, right?

Well sure. It took a couple of minutes. But one of my big pet peeves about Google Chrome is this ridiculous idea that the full URL doesn’t need to be displayed.

We could argue the merits of this idea elsewhere (feel free to leave a comment below or reply to me on Twitter if you feel strongly about it), but at least for technologists who build, support, debug, or otherwise work very closely with web properties, WE NEED TO SEE THE WHOLE FREAKING URL, GOOGLE.

Since my user profiles normally keep this setting, I hadn’t needed to solve this problem in a fresh way for quite some time. The old methods involved using chrome://flags (which I definitely used in the past) or even installing an extension (EW!). Many of those solutions persist out there on the web (or even in the Google Chrome help center’s community).

Here It Is: Right-Click in the Address Bar

We’re now formally calling it the “omnibox,” but whichever way you refer to it, you want to:

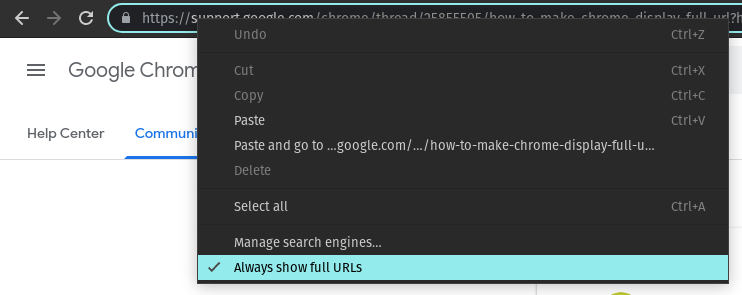
  1. Right-click in the omnibox (address bar)
  2. Choose “Always show full URLs”

I hope this helps!

Setting Up WordPress Multisite with Subdomains and a Wildcard Let’s Encrypt Certificate on NGINX

Recently I found myself needing to move an existing WordPress Multisite installation off of a popular shared host. The main goal was to improve the site’s performance (load speed, etc.) and we have more ability to fine-tune things in an environment we fully control.

But it’s been awhile since I tinkered with Multisite and so I didn’t have a current set of “best practices” around how to set configure the nginx server block to handle subdomains that might be set up on the fly any time the site’s owner wants to add a new “site” to the network.

More importantly, we’ve switched to Let’s Encrypt as our provider for TLS certificates, and when we initially did so, they weren’t yet handling wildcard certificates. They added this capability some time ago now, but this was my first excuse to try it out.

So the goal was: configure nginx and Let’s Encrypt to properly handle any new subdomains added to the WordPess install without having to manually change the server configuration.

Quick Overview of the Tech Involved

We moved the site to a VPS on a Digital Ocean droplet with a LEMP stack with:

  • Ubuntu 20.04
  • nginx 1.18.0
  • MySQL 8.0.22
  • PHP 7.4

The other sites hosted on this droplet are mostly standard WordPress sites where the www subdomain is redirected to the domain name, so they use a more or less standard nginx server block that we’ve fine-tuned over time.

We’re obtaining TLS certificates from Let’s Encrypt using certbot and the --nginx flag to manage the certificate installation process.

First: nginx Config for WordPress Multisite

Our “standard” nginx server block works really well for WordPress and we get great performance out of a socket connection to php-fpm.

Our nginx rewrite rules, however, don’t anticipate the need to handle multiple subdomains that are subject to change over time.

Thankfully, there’s an nginx recipe for WordPress multisite that we were able to use as a starting point. The important thing to remember is that WordPress can be configured to add new sites as subdirectories (e.g. example.com/mysite) or as subdomains (e.g. mysite.example.com). We’re using the subdomain method, and so this recipe was the one we needed.

The recipe calls for a new section before the server block in the file located at /etc/nginx/sites-available/domain.com that leverages the nginx map module to set up a variable to handle the various subdomains.

map $http_host $blogid {
	default       -999;
}

Then inside the server block itself (i.e. between the server { and } for the domain in question), we add some lines that call those variables:

	#WPMU Files
	location ~ ^/files/(.*)$ {
		try_files /wp-content/blogs.dir/$blogid/$uri /wp-includes/ms-files.php?file=$1 ;
		access_log off; log_not_found off;      expires max;
	}

and

	#WPMU x-sendfile to avoid php readfile()
	location ^~ /blogs.dir {
		internal;
		alias /var/www/example.com/html/wp-content/blogs.dir;
		access_log off;     log_not_found off;      expires max;
	}

Aside from those additions, we’re using our standard set of parameters for a typical WordPress installation.

Next: Get a Wildcard Certificate from Let’s Encrypt

Our typical method is to call certbot with the --nginx flag and let it put its ACME protocol token in the /.well-known subfolder to handle domain validation. This method, known as the HTTP-01 challenge, works well when we’re requesting issuance of a cert for the domain itself and for the www subdomain.

That request typically looks something like this:

sudo certbot --nginx -d example.com -d www.example.com

But we cannot use the HTTP-01 challenge to request a wildcard cert.

What is a wildcard TLS certificate?

Requests like the one shown above result in the issuance of that is valid for exactly 2 domains: example.com and its subdomain www.example.com.

Thus, when a visitor’s web browser connects to the server and requests a URL containing one or the other of those addresses, the server can legitimately negotiate a TLS connection and encrypt the traffic for it.

But since we’re setting up WordPress as a multisite installation in order to allow the site owner to create new sites on the fly, we aren’t able to predict all of the subdomains that need to be listed on the TLS certificate.

What we need instead is a TLS certificate that is valid for the domain itself (i.e. example.com) and for any subdomain of the domain. Thus, we want to request a certificate using a wildcard to represent the subdomain. In this case, the asterisk character serves as the wildcard, and so we want the cert to be valid for: example.com and all possible subdomains *.example.com.

The problem is that Let’s Encrypt does not permit the issuance of wildcard certificates using the HTTP-01 challenge. Instead, we need to make use of the DNS-01 Challenge.

Configuring the Let’s Encrypt DNS-01 Challenge on the Digital Ocean Platform

The DNS-01 Challenge requires that you prove that you have control over DNS for the domain rather than just a web server for the domain. It works by setting a TXT record for the domain at _acme-challenge.example.com which contains the ACME protocol token as its value.

As you might imagine, having to create this record manually and then update it every 90 days when Let’s Encrypt needs to renew the certificate would be a painful manual process.

Thankfully, there are DNS plugins for certbot which help automate the process as long as DNS is hosted by one of the compatible providers. Currently, that list includes: Cloudflare, CloudXNS, Digital Ocean, DNSimple, DNS Made Easy, Google, Linode, LuaDNS, NS1, OVH, Route53 (from Amazon Web Services), and any DNS provider that supports dynamic updates as described in RFC 2136.

It was a happy accident that I had decided to use Digital Ocean to host the DNS for this domain. I did it without realizing that I needed this kind of compatibility. So I was pleased to discover that Digital Ocean supports DNS updates via its API and that there’s a certbot plugin for their platform: dns_digitalocean.

I found some of the documentation around getting this plugin installed on my server a little confusing. One recommendation involved using pip3 (the Python 3.x package manager) to install it. But since I had installed certbot from the Ubuntu standard PPAs using the apt package manager, the version of the plugin that I got using pip3 wasn’t actually connected to the certbot installation I was using.

Ultimately, I realized I could install the plugin I needed using apt like this:

sudo apt install python3-certbot-dns-digitalocean

To fully configure it, I got a shiny new personal access token for the Digital Ocean API from the Applications & API page of my Digital Ocean account.

Then, I created a new file at /home/myloginusername/.secrets/certbot/digitalocean.ini that looked like this example from the plugin documentation:

# DigitalOcean API credentials used by Certbot
dns_digitalocean_token = 0000111122223333444455556666777788889999aaaabbbbccccddddeeeeffff

Note: in case this isn’t abundantly obvious, the token shown above is fake and will need to be replaced by a real token that is unique to you and should be treated as if it’s the password to your Digital Ocean account… because anyone with your API token has access to all of the capabilities of their API.

Also, one potential point of confusion I ran across. Since I use sudo to run certbot with elevated privileges, I thought perhaps this file should be located in the root user’s home folder (e.g. home/root/.secrets/...), but this turned out to be incorrect. It belongs in the home folder for the user that you authenticate with when you log in to Ubuntu.

Also, chmod that file to 0600 to help keep it safe:

chmod 0600 /home/myloginusername/.secrets/certbot/digitalocean.ini

You shouldn’t need sudo for that command since it’s in your home folder.

With the certbot dns plugin for your dns provider successfully installed and configured properly, you’re ready to request the cert.

In my case, I wanted to use the dns-digitalocean plugin to handle the authentication part of the certificate issuance, but I still wanted to use the nginx plugin to handle the installation of the certificate. This would greatly simplify ongoing maintenance tasks because I’d used the nginx plugin to handle installation of the other certs on this server.

Thankfully, it’s possible to combine certbot plugins to do exactly this by using the --installer flag with “nginx” as its value.

The command I used ended up looking something like this:

sudo certbot \
  --dns-digitalocean \
  --dns-digitalocean-credentials ~/.secrets/certbot/digitalocean.ini \
  --dns-digitalocean-propagation-seconds 60 \
  --installer nginx \
  -d example.com \
  -d *.example.com

Bascially, the command tells certbot to create an ACME protocol token, create (or update) the TXT record for this domain using the Digital Ocean API so that the record’s value matches the ACME token, then wait 60 seconds to give DNS a little time to propagate, and then run the DNS-01 challenge and issue/install the cert.

Your Mileage May Vary

Obviously, different server configurations and hosting environments will work differently, but if you happen to be running a VPS with a LEMP stack based on Ubuntu 20.04 and need WordPress Multisite to work with wildcard subdomains and a wildcard TLS certificate from Let’s Encrypt, then this process will generally be workable.

What questions do you have? I hope you found this useful. It’s always great to hear about it either here (feel free to comment below), or you can hit me up on Twitter: @TheDavidJohnson.

Cheers!

Image credit: Fikret tozak on Unsplash

Intentional Growth

Disclaimer: this is not some kind of “rise and grind” or “you got this” kind of post. Not at all.

2020 has been a hard year. For all of us.

And just when I think it’s dumped as much sh*t as it can possibly pile on, 2020 seems to find new ways to exceed my expectations.

I was already dealing with some tough personal stuff coming into this year. And although I’ve done my share of full-on “head in the sand” avoidance, I’ve been determined to do the hard work. It means facing unpleasant things.

Unpleasant. Painful,even. But worth it. I’m compelled to grow and move forward.

Not long ago, I ran across a couple of lines in one of my notebooks:

All growth involves hardship.

Intentional growth requires voluntary hardship.

Giving Credit Where Credit Is Due

I wish I could tell you precisely who said these words, or even if they were spoken exactly this way. But I jotted them down during a panel discussion at the Menfluential Conference in February, 2018.

The members of the panel that morning were:

Fitness panel featuring Ryan Masters, Matt Reynolds, and Alan Roberts

Whichever one of you conveyed this idea, I thank you. It resonated strongly with me that morning, and has come up time and time again ever since.

And now… onward.

Stop Microsoft Products from Auto-Starting on Linux

TL;DR: Change the settings inside each app. Step by step instructions here.

The pain I experienced years ago when I realized I would need to install a Microsoft product on my Ubuntu laptop was substantial on top of being ironic. After all, I became a full-time Linux user to avoid Microsoft.

But back then, Skype was important for certain client work, and even today it’s useful for recording podcast guests because Skype can be configured to provide decent quality audio.

Fast forward to earlier this year, and I discovered that Microsoft makes a Teams client for Linux. Who knew, right? Bizarrely, I found myself installing it in order to collaborate with a client. And while I wouldn’t use it of my own free will, it’s really not that bad.

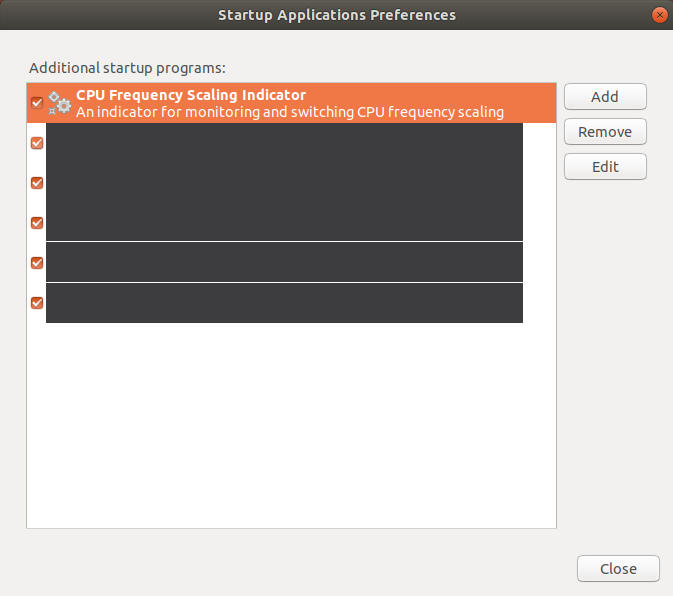
But both Skype for Linux and Microsoft Teams for Linux suffer from the same problem. They don’t behave as expected when using the GNOME Startup Applications preferences tool.

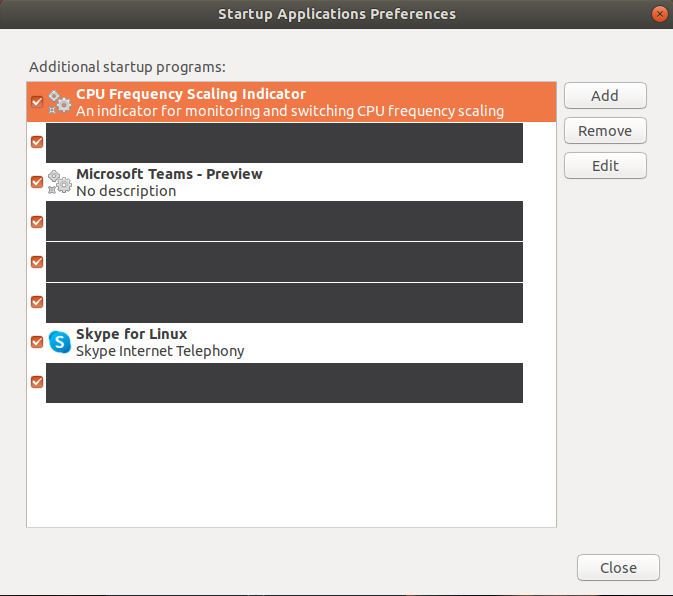
Screenshot of GNOME Startup Applications Preferences dialogue showing the reappearing Microsoft Teams and Skype applications

For months now, I’ve been dealing with the minor irritation of having Skype and Microsoft Teams autostart when I sign in to Linux, despite my repeated efforts to stop them.

I’d casually looked for ways to solve this, but recently it happened one too many times. Microsoft Teams launched itself and slowed me down on my way to get important stuff going. And Teams is a resource hog—even on my relative beast of a system.

It turns out that both Skype for Linux and the Microsoft Teams Linux client have their own settings for this which (naturally) default to autostart on boot.

Thankfully, I did finally find a solution that seems to work for both apps.

Step-By-Step Instructions to Disable Microsoft Apps from Launching at Boot in Linux

Prevent Microsoft Teams from Launching at Boot on Linux

  1. Open the Settings Menu

    With the Linux client for Microsoft Teams running, click on your user profile image in the upper right, then choose “Settings” from the menu that drops down.

  2. Uncheck the “Auto-start application” box

    In the “General” tab, under the “Application” heading, you should find a checkbox labeled “Auto-start application.” It is checked by default. Uncheck it to prevent Microsoft Teams from launching when your system boots.

  3. Close the “Settings” dialogue box

    There is no “save” button in the Linux client for Microsoft Teams. Just hit the “X” in the upper right-hand corner of the “Settings” window to close it.

Prevent Skype from Launching at Boot on Linux

Similar to the Microsoft Teams client, Skype for Linux has an option buried in its settings.

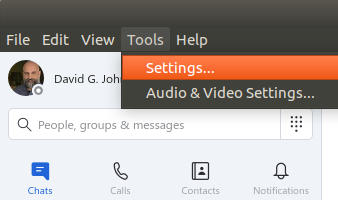
Start with the “Settings” menu option, which you’ll find under “Tools” in Skype’s main menu.

Then choose “General” from the options that appear in the left-hand side of the “Settings” menu:

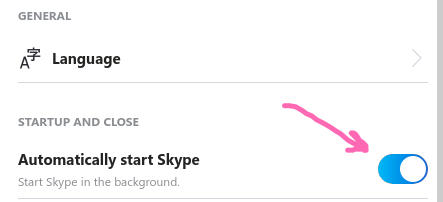
Then find the switch marked “Automatically start Skype” under the “Startup and Close” header. It defaults to the “On” (blue) position:

Slide it to the “off” (gray) position, and you’re all set.

Why Doesn’t Microsoft Follow Conventions?

Ironically, after setting both of these switches, you’ll find the programs no longer appear in the GNOME Startup Applications Preferences:

In my experience, other apps built for Linux can be maintained right from here—at least in terms of their settings for starting up at boot time.

As of this writing, however, these two Microsoft apps cannot. The current settings for Skype and Microsoft Teams related to auto-starting can be viewed from here, but changes made here will be overridden by in-app settings.

I hope you find this helpful!

9/11 in 2020

9/11 will always represent a pivotal moment in my life.

19 years ago, I decided to take a massive leap of faith and commit fully to the business that I still operate today. I gave notice at my job, and Monday, September 10th, 2001 became my first day as a full-time marketing consultant.

This isn’t going to be a “where were you on 9/11?” post. I did that on the 7th anniversary. Nor is it a reflection on the bizarre connection my local community has to the tragic events of that day… nor of the apparent FBI goof-up.

Instead, this is a brief meditation on how 9/11 feels in the most bizarre year of our lives.

2020 is the year that so much has crystallized for me. And possibly for others.

In 2020, more than ever, I find that I:

  • distrust government, media outlets, and tech platforms more than ever
  • detest the politicization of everything from wearing masks to treating human beings with dignity and respect (or not)
  • despise the binary view of beliefs which attempts to place everyone on either the “left” or the “right”
  • lament the loss of hopes and dreams on the part of so many—from fires and other calamities… from watching the fabric of our society fray before our eyes… or from witnessing the foundations of our economy quake
  • labor every day without the sense that I’m making a meaningful contribution any more.

In 2001, we were attacked by an enemy. I wept for the families of the 9/11 victims. I was heartbroken for New York City. And I was stricken with a sense of duty to protect the freedoms and values that I thought our nation represented.

In 2020, we are the enemy. We’ve lost our ability to listen and to speak. Our love for our fellow human beings seems to have vanished. Our system of government seems to be failing. Our institutions are untrustworthy.

The 9/11 attacks took place over the span of mere hours—a bright flash of terror that changed us forever.

The 2020 attacks have taken months—a gradual glow, not of terror, but of dismay.

How will we recover?

How to Convert a Word Document to Markdown Format

So you need to get your nifty Word doc into a format that can be used on the web, handled by a wide variety of editors, or — if you’re like me — included in a git repository.

The Problem: You Created Your Content in Microsoft Word

Isn’t that always a problem?

OK I’m not a Microsoft fan these days—almost across the board. Haven’t been for many years.

But not long ago I created a massive proposal for a client that we’re partnering with for some projects. Our client is a Microsoft shop through and through, and I’ve been forced to install Microsoft Teams on my Linux machine to collaborate with their crew. This has actually been a surprisingly good experience—allowing me to use Microsoft Word on Ubuntu. (Yes, this could have been done in the browser, but I find the desktop client for Teams to be quite good.)

But now we need to be able to repurpose and reuse much of the content in the proposal in future proposals, which will require a fair amount of editing, version control, change tracking, etc.

Sure. This could theoretically be done in Microsoft Word, but we all know that git is a much better tool for that job, am I right?

The Goal: Edit Content from Word in a git Repository

From a high-level viewpoint, what I want to do is create a modular set of content elements that can then be loaded into the client’s proposal generator tools with nice formatting.

The Process: Converting a .DOCX File into a Markdown File Using pandoc

I engaged in some trial and error (details below if you’re interested), but for my purposes, pandoc was the tool for the job. Since it’s written in Haskell, there’s an installer for Windows, MacOS, various flavors of Linux … heck, there’s even something for ChromeOS and a Docker image, to boot!

Time needed: 5 minutes

  1. Download and install pandoc

    Save yourself some trouble download the latest release from the pandoc GitHub repository. Ubuntu’s package manager had a very outdated version, but the release in the code repository includes a handy .deb file, which was exactly what I needed for my system.

  2. Open a command prompt and navigate to the folder where your Word doc is located

    On Ubuntu, I hit CTRL+ALT+T to open a new terminal window, and then changed directories:

    cd ~/Documents/MyFolder/

    where MyFolder is the name of the directory where your Word doc is located.

  3. Convert the file

    Running pandoc is relatively straightforward for a job like this:

    pandoc MyWordDoc.docx -f docx -t markdown -o MyWordDoc.md

    where MyWordDoc.docx is the name of the Word document you want to convert and MyWordDoc.md is the name of the output file (call yours anything you want, but it’s useful to name it with a .md file extension).

Frankly, this yielded fantastic results for me. The proposal was intentionally crafted with relatively simple formatting, so there weren’t too many bizarre elements to worry about.

That said, even a cursory glance at the pandoc documentation reveals that it has substantial capabilities. I’m filing that one away for future reference! For now, I’m not even scratching the surface of what it can do.

Huge thanks to John MacFarlane for building pandoc and making it available!

That’s it! I hope this helps! Feel free to throw a comment below one way or the other.

Also: thanks to V. David Zvenyach (@vdavez) for posting this fantastic Gist on GitHub to get me started down the right path on this!

Here’s What Didn’t Work For Me

Everything that follows is just here because it’s cathartic for me to document stuff that I’m nearly 100% certain no one else will find useful. You’re welcome to ignore this part!

Mr. Zvenyach’s approach was to convert a Word document (in .DOCX format) to Markdown using 2 tools: unoconv and then pandoc.

It wasn’t until I’d installed both tools on Ubuntu and run the Word doc through unoconv that I discovered a comment on the gist which indicated that pandoc could now handle Word docs directly.

In fact, using the version of <unoconv> from Ubuntu 18.04’s package manager, I got a nasty error message:

func=xmlSecCheckVersionExt:file=xmlsec.c:line=188:obj=unknown:subj=unknown:error=19:invalid version:mode=abi compatible;expected minor version=2;real minor version=2;expected subminor version=25;real subminor version=26

The unoconv repository’s readme file mentions python compatibility issues related to the version it’s compiled with and the version used by LibreOffice/OpenOffice (my system has LibreOffice given that’s what comes with Ubuntu).

I was going to attempt a workaround as described in the readme to see if the python version might be behind the error message I got, but then I noticed that the script had output an html file.

So I ran that file through pandoc and got a Markdown file. The resulting output wasn’t pleasant.

So I decided to upgrade pandoc and just skip unoconv altogether. Seemed like it might be worth a try.

My Ubuntu 18.04 LTS system ended up with pandoc 1.19.2.4 when I installed using apt install pandoc, but the current release shown on the pandoc website as of this writing is pandoc 2.9.2.1.

Since I got such great results, that was where I stopped. But I certainly could have tried a more recent version of unoconv to see what it might be capable of doing. And I’m sure there are other ways to accomplish this, but I’ll be sticking with pandoc for now.

Be sure to let me know what you’ve discovered or run into. I’d be very interested in hearing about it! Just drop a comment below. Thanks!

New Podcast for Business People with ADHD

Last year, I started writing a little bit on my personal blog about the fact that I have ADHD.

This was quite a startling revelation for reasons that I won’t get into now. But the “shiny object syndrome” which is clearly shared by many of the:

  • entrepreneurs
  • business owners
  • freelancers (designers, software engineers, web developers, marketers, musicians, etc.)

… that I’ve known is clearly related.

Do All Entrepreneurs Have ADHD?

Clearly that would be a bogus claim to make. But the idea that entrepreneurship is correlated with ADHD is grounded in science. One study from 2018 said:

This grounds prior research on ADHD and entrepreneurship, indicating that individuals with ADHD are indeed more likely to not just espouse entrepreneurial intentions, but also to initiate business venturing.

Lerner, D.A., Verheul, I. & Thurik, R.

Resources for Entrepreneurs with ADHD

An overwhelming majority of the information online about Attention Deficit Hyperactivity Disorder (“ADHD”), formerly known as Attention Deficit Disorder (“ADD”) is focused on children, schoolwork, and parenting.

For someone like me that was diagnosed as an adult, it’s been difficult to find credible, reliable information that I can use as a business owner to help me manage the downsides of ADHD and maximize the many upsides of this powerful trait.

After working with Dana Rayburn, who is a very successful (and helpful!) coach for professionals and business leaders who have ADHD, I experienced such incredible benefits, that one day I suggested on a whim that we start a podcast.

Thankfully, Dana was a fan of the idea!

And so, Kick Some ADHD was born!

We launched a couple of weeks ago, and we’re releasing a new episode every Monday morning. In fact, today’s episode was part 2 of a two-parter on the unique ways that we procrastinate (everyone does it, but people with ADHD have refined it to new levels!) and what we can do about it.

You can find the podcast by searching Apple Podcasts, Google Podcasts, Stitcher, Spotify, and most every other place you get your podcasts. Or just visit the website for links.

I hope you enjoy the show!

Editing Vertical Video in Blender

Just set the “Properties” to 1080×1920, right?

Wrong. The video clip I brought in was weirdly cropped and distorted instead.

I wouldn’t have thought this would’ve been difficult. I tried a few things and nothing was turning out quite like I had expected.

But thankfully, there are generous people on the internet who make things, answer questions, and are all-around good people. I did a fair amount of snooping and testing before sorting out what I think is probably the easiest way to edit and render a clip shot vertically using Blender.

Here’s what I settled on.

How to Edit and Render Vertical Video in Blender.

  1. Download the VSE Transform Tools add-on script for Blender.

    The original project hasn’t been updated in a while, so this fork is the one that worked for me.

    To get the right downloadable ZIP file for your system, go to the releases page and look for the release that matches the version of Blender you’re using.

    Important: double-check your Blender version. I’m on Ubuntu and could’ve sworn that I was using the 2.8 branch of Blender. I hit an error message with the add-on and eventually checked my Blender version and found that I was actually on the 2.79 branch. Oops!

    Make sure to download the .zip file named “VSE_Transform_Tools.zip”

    Huge thank-you to Daniel Oakey for updating this script and of course to kgeogeo for posting the first version.

  2. Install the VSE Transform Tools add-on

    Launch Blender and go to File → User Preferences and then click “Add-ons”.

    Click the “Install Add-on from File…” button and browse to the .zip file you downloaded in step 1. Once you’ve clicked the filename to select it, click the “Install Add-on from File…” button.

    Now click the check mark next to “Sequencer: VSE Transform tools” to activate the add-on.

    Note: here’s where I got an error message the first time. It was because I had installed the latest “Release” of the add-on and it turned out that I wasn’t yet using the 2.8 branch of Blender. That meant I had to remove the add-on (since it wouldn’t activate anyway) and go back and download an earlier “Release” of VSE Transform Tools and install it instead.

  3. Save your user settings if you plan to edit vertical video in the future.

    The add-on is active for your current Blender session. Before you close the “Blender User Preferences” dialogue box, click the “Save User Settings” button to make sure the new add-on will be active every time you launch Blender in the future.

  4. Set the vertical aspect ratio in the “Properties” of the Blender Video Sequence Editor.


    If the “preview” window in Blender still shows a horizontal layout instead of a vertical layout, then you’ll need to set the aspect ratio.

    Note: the remaining steps assume that your source video clip was shot in HD at a resolution that would’ve been 1080p if your camera hadn’t been rotated to shoot vertically.

    View the “Properties” for the Video Sequence Editor just like you would if you were about to render your clip.

    Go to the “Dimensions” panel and find the “Resolution” section.

    Since I usually edit at 1920×1080, my values were set that way. If yours are like mine were, simply swap the X and Y values so that they read:

    X: 1080
    Y: 1920

    Again: if your source video was shot at a different resolution, you’ll need to use values that match your clip.

    Now’s a good time to go ahead and set the slider underneath those values to 100% if yours defaults to 50% the way mine does.

  5. Rotate and Scale Your Video Strip

    Thanks to these instructions, I found it very simple to rotate the video and get it scaled correctly.

    If you haven’t already done so, add your source video clip to the Video Sequence Editor in Blender.

    Select your video strip in the timeline by right-clicking on it. Be sure that just the video strip is selected and not the associated audio strip (assuming you have one of those).

    Press “t” on your keyboard. This creates a transform effect using the add-on we installed.

    Move your mouse to the “preview” window and press “r” on your keyboard. This activates the rotation tool. You can try to rotate it with your mouse, or you can type “90” on your keyboard to get an exact 90 degree rotation.

    With your mouse over the “preview” window, press “s” on your keyboard. This activates a scaling tool. I had no success with the mouse here, but you’ll see an “effect strip” in your video timeline that you can select. With that strip selected, look for the “Scale” section in the Properties (“Edit Strip”) and enter these values:

    X: 1.777777778
    Y: 0.5625

That’s it! Your video should look right in the “preview” window in Blender.

Edit away and render as usual!

How to Undo an Import into Google Calendar

Well crap.

I mistakenly imported an .ICS file into Google Calendar which added 758 events to my personal calendar that I don’t want to have.

Where’s the undo button?

There isn’t a way to undo an import into Google Calendar.

However, thanks to this blog post I found a trick that ended up working for me—with one important modification.

The file I imported into my calendar did not have a “STATUS” field for any of the events. So the find & replace function described in that blog post didn’t work exactly as described.

Here’s the exact process I used.

Undo an import into Google Calendar

  1. Open the original .ics file in a text editor

    Yes… take the same file you imported into Google Calendar. We’re going to make some changes and re-import it. I used Sublime Text, which is one of my absolute favorite editors of all time.

  2. Search for occurrences of “STATUS”

    If your .ics file has “STATUS” fields, then you want to edit each one of them. You can do this in bulk using the “Find & Replace” function in your text editor of choice. If your file has these fields, you can follow the directions in this post to replace the existing status entries. If your file doesn’t have any of those fields, then you can go to the next step like I did.

  3. Find & replace the “END:VEVENT” field

    We need to add a new field to every event in the .ics file. To do this, we’re going to find every occurrence of a field that every event has. I chose to use the “END:VEVENT” field for this.

    The trick is that we need to replace that field with itself plus a new field.

    So I used this as the “Find” criteria:

    END:VEVENT

    And used this as the “Replace” value:

    STATUS:CANCELLED
    END:VEVENT


    This effectively adds a “STATUS” field to every event, and sets the value of that field to “CANCELLED.”

  4. Save the edited .ics file and re-import it into Google Calendar

    I recommend saving the .ICS file with a new name to avoid any confusion. Then, import the newly edited file into Google Calendar exactly as you imported the original file. Once Google Calendar processes this, it will find every matching event and mark them “Cancelled”—effectively removing them from your calendar.

This technique is especially effective if you intended to subscribe to a feed rather than importing a static set of events.

This is precisely what I wanted to do. I want to stay up to date with changes on the 3rd-party calendar, not capture a snapshot of everything on it today and then treat them all as appointments.

Hopefully, this will help someone other than me. Cheers!